
Yesterday, Wayne tweeted this:
@erochest just dropped some vim wizardry on the @scholarslab: open system fonts, set the guifont from the settings selected in gui
I thought I should describe what I did, for several reasons. First, it’s kind of cool, in a geeky vim-lover kind of way. Second, it’s not something you do everyday, so it’s helpful to have it written down. I’m pretty surprised that I remembered it as quickly as I did.
Step 1: Select the Font Using the Standard Font Dialog
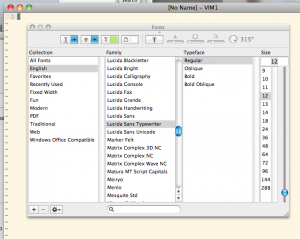
In Vim, pop open the GUI to select the font by typing in this command: :set guifont=*. It should open up the standard font dialog box for your platform.
Select the font you want to use and close the dialog.
Step 2: Add the Font to Your .vimrc file.
Now you need to make the change permanent by adding it to your .vimrc file.
Open this file using the command :e ~/.vimrc (on Linux, UNIX, and Mac) or :e ~/_vimrc (on Windows). Then add this to the bottom:
set guifont=
At this point, you need to insert the current value of guifont. Do this by pressing Ctrl-R (while still in insert mode) and entering this in the command bar at the bottom of the screen:
=&guifont;
Hit enter. The name and size of the font should be appended to the set guifont line you started.
If the font name has spaces, however, you’ll need to escape those. This command should do the trick:
:s/ /\ /g`
Unfortunately, this does a little more than you want. It also escapes the space after set. Take that out manually.
Now, the line should look something like this:
set guifont=DejaVu Sans Mono:h13
Bonus
Some nice fonts I’ve used with Vim over the years include these:
-
Lucida Sans Typewriter Regular (free with many Microsoft products).